If you are looking for a nail design that is both elegant and trendy, translucent pink nails are a perfect choice! This style has been growing in popularity in recent years, and it is easy to see why. With their soft, feminine look, they are perfect for special occasions or everyday wear. In this guide, our experts will share professional tips on creating perfect shapes in this design and will also provide the best design ideas for you!
The best shapes for translucent pink nails
They are oval, almond, and stiletto. These shapes are elegant and will complement any outfit. If you are going for a more feminine look, try adding some glitter or rhinestones to your nails. For a trendier look, try an ombre design or experiment with different colors. Whatever you choose, these nails are sure to turn heads!
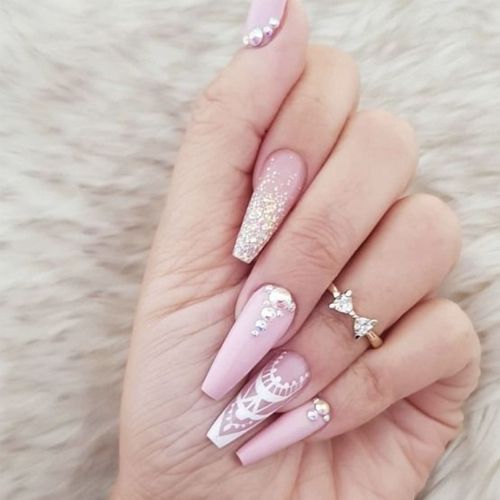
Qingge Long translicent pink and white nails with rhinestones, gold glitter and clear elements [Long] Colors: white, nude pink, gold 20+ Ratings | ||
RikView Long acrylic translucent light beige coffin nails with glitter and rhinestones [Long] Colors: nude beige 850+ Ratings | ||
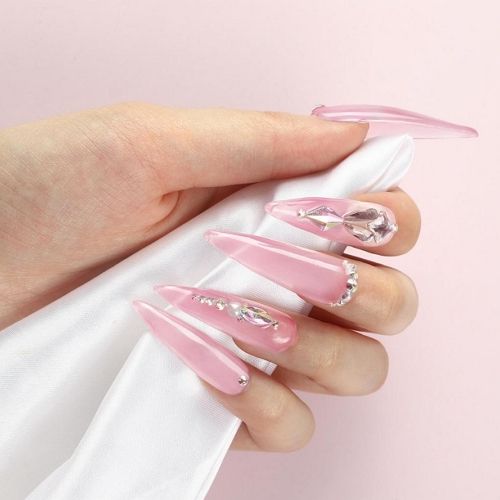
ArtQuee Long ballerina press-on translucent nails with clear elements, glitter and clouds [Long] Colors: pink, clear, milky white 3.800+ Ratings | ||
RikView Long coffin nails in translucent semi-clear pink color with glossy finish [Long] Colors: light pink 600+ Ratings | ||
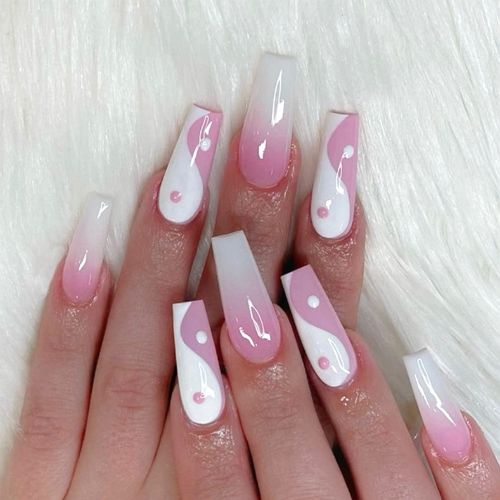
Davnjcka Medium length semi-transparent press-on nails with ombre glitter and 3D rhinestones [Medium length] Colors: transparent, nude pink 240+ Ratings |
Each of these shapes has pros and cons. So, compare them when selecting the best nail form for you:
- Oval nails are classic and elegant. They are also easy to maintain and don’t require much filing. However, if you have wide fingers, they may make your hands look even wider.
- Almond nails are very popular right now. They are similar to oval nails but have a more tapered shape. This makes them perfect for those who want to add length to their nails without making them look too wide. However, almond nails can be difficult to file and may require regular maintenance.
- Stiletto nails are the most dramatic of the three shapes. They are long and pointy, which can make your hands look extra slim. If you are going for this look, make sure you have the time.
How to create translucent pink nails: step-by-step tutorial
Now that you know the best shapes for this design, it’s time to learn how to create it! Follow these simple steps and you will have perfect translucent pink nails in no time.
- Start by filing your nails into the desired shape. If you are not sure which shape to choose, we recommend oval or almond.
- Next, apply a base coat to protect your nails and help the polish adhere better.
- Once the base coat is dry, apply two coats of translucent pink polish. Make sure each coat is thin and even.
- To finish, apply a top coat for extra shine and protection.
And that’s it! You now know how to create perfect translucent pink nails.
If you are looking for a quick DIY way to create translucent pink nails, you can always choose quality stick-on nails. These are available in different shapes and sizes, so you can find the perfect fit for your nails.
Here is a quick instruction that will help you apply these nails perfectly.
- Start by prepping your nails by cleaning them with soap and water.
- Next, use a nail file to file down the tips of your nails. This will help the adhesive adhere better.
- If you have any cuticles, push them back with a cuticle pusher.
- Now it’s time to apply the adhesive. Start in the center of your nail and work your way out. Be sure to avoid getting any glue on your skin!
- Once the adhesive is dry, it’s time to apply the nails. Starting at the center of your nail, press each nail into place.
And that’s it! You now know how to apply stick-on nails perfectly.
Common mistakes when making translucent pink nails
One common mistake when making translucent pink nails is using too much polish. This will make your nails look streaky and opaque. Another mistake is not waiting for each coat of polish to dry before applying the next one. This will cause the polish to smudge and ruin your design.
If you want perfect translucent pink nails, be sure to avoid these common mistakes!
Now that you know how to create this beautiful nail design, it’s time to get creative! Experiment with different shapes, colors, and embellishments to find a look that is perfect for you.
Additional nail design elements that will look great with this nail design
There are many additional nail design elements that will look great with this nail design. One popular option is to add a touch of glitter or rhinestones. This will add some extra sparkle and make your nails really stand out. Another option is to experiment with different colors. Try an ombre design or use two different colors for a fun and unique look.
You can also add these extra decorative elements for a more finished look:
- Add a touch of glitter or rhinestones
- Try an ombre design
- Use two different colors
- Use stamping or stickers
Now that you know how to create this beautiful nail design, it’s time to get creative! Experiment with different shapes, colors, and embellishments to find a look that is perfect for you. Have fun and enjoy your new nails!
Meet our Expert
 Elaine Andrews is a professional nail technician with 12+ years of experience. She works both with gel and acrylic nails and creates artistic nail designs for her customers. She has been training nail technicians for over 6 years and is an author of her own patented nail courses. Feel free to use the comment field below to ask Elaine something you wanted to know about nails and manicures!