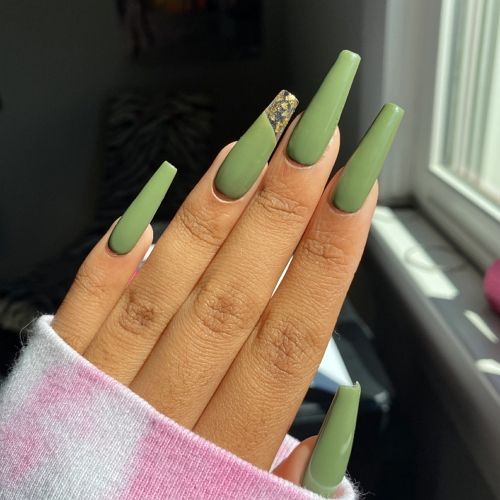
Do you want to know how to create coffin nails in olive green? This step-by-step guide will show you how! Coffin nails are all the rage right now, and for a good reason. They are elegant and timeless and can be worn with any outfit. This tutorial will show you how to create the perfect coffin shape and apply a beautiful olive green finish. Let’s get started!
Best Press-On Olive Coffin Nails
 | CoolNail
Extra-long UV gel press-on coffin nails Color: olive green 1600+ Ratings | |
 | YOSOMK
Long press-on matte green olive coffin nails with glitter design Color: olive green, nude pink, gold 380+ Ratings | |
 | RikView
Long press-on acrylic nails with glitter and rhinestone designs Color: olive green, nude pink, gold 450+ Ratings | |
 | RikView
Fake long acrylic coffin nail set with golden glitter ombre design Color: olive green, gold glitter 220+ Ratings | |
 | YOSOMK
Fake long acrylic almond shaped nail set with light beige and black elements Color: olive green, matte finish 330+ Ratings |
Creating coffin nail shapes with different materials
There are many ways to create coffin nails. You can use acrylic, gel, or even solar nails. But for this tutorial, we will be operating regular nail polish. The first step is to file your nails into the desired shape. If you are unsure how to do this, you can ask your local salon for help. Once your nails are filed, it is time to apply the base coat of polish.


We recommend using a clear or nude color so that the olive green polish will stand out more. By the way, you can consider sage green coffin nails. After the base coat is dry, it is time to apply the olive green polish. We recommend using two coats so that the color is opaque and rich. Once the olive green polish is dry, you can apply a top coat of clear polish to protect your nails and give them a glossy finish. And that’s it! You have now created coffin nails in olive green.
DIY glue-on coffin nails
If you don’t have time to go to the salon or you want to save money, you can also create coffin nails at home. You only need a bottle of clear nail glue and some fake nails. You can find fake nails at your local beauty supply store or online. Once you have your materials, simply glue the fake nails onto your natural nails.
Make sure the glue is completely dry before proceeding to the next step. After the glue is dry, file the fake nails into the desired shape. Once they are filed, you can proceed with painting them as we did in the previous section. And that’s it! You now have DIY coffin nails that look just as good as if you had gotten them done at a salon.
How to apply olive green polish without flaws
Olive green is a beautiful color, but it can be tricky to apply without any flaws. The key is to use thin coats of polish and let each coat dry completely before applying the next one. If you try to apply too much polish at once, it will end up looking streaky and uneven. The same situation can happen with a black finish when coloring matte black coffin nails. So take your time and enjoy the process!
We hope you enjoyed this tutorial on creating coffin nails in olive green. Now that you know how, go ahead and try it for yourself! You will love the way your nails look.
Meet our Expert
 Elaine Andrews is a professional nail technician with 12+ years of experience. She works both with gel and acrylic nails and creates artistic nail designs for her customers. She has been training nail technicians for over 6 years and is an author of her own patented nail courses. Feel free to use the comment field below to ask Elaine something you wanted to know about nails and manicures!